Table of Contents
- Introduction
- Main Features
- How To Setup TR4 System
- All TechnoResearch Cables
- Troubleshooting
- Common Jobs
- Updating Centurion License
- Non-Stock ECUs
- Connecting via Bluetooth
- Victory / Indian Diagnostics
- Checking DTCs Manually (HD)
- FAIL message When Performing Blank ECU Programming
- 1. Centurion Setup and Installation
- 1.1 Where to get the Software
- 1.2 Install Centurion
- 1.3 Run Centurion
- 1.4 Insert Security Key into USB Port
- 1.5 Connect USB Cable
- 1.6 Powerup the Centurion
- 1.7 Powerup to Automatically Install Drivers
- 1.8 Update the Centurion Software
- 1.9 Centurion Disclaimer/Language Selection
- 1.10 Confirm COM Port for Communication
- 1.11 Troubleshooting COM Port Issues
- 2. Using the Centurion
- 3. Centurion Toolbar Icon Description
- 4. Centurion – How to Change Units/Colors
- 5. Centurion Super Pro/Audio – Monitor Real-Time Data (Digital Data View)
- 6. Centurion Super Pro/Audio – Monitor Real-Time Data (Strip Chart Display)
- 7. Centurion Super Pro – Harley Davidson Tests and Activations
- 8. Centurion – Specific Functions for Harley-Davidson® Motorcycles
- ECU/ECM
- 8.1 Centurion Super Pro/Audio – Read And Clear DTCS
- 8.2 Centurion Super Pro – Speedometer Calibration
- 8.6 Centurion Super Pro – Air Fuel Value (AFV)
- 8.7 Centurion Super Pro – Idle Adjustment
- 8.8 Centurion Super Pro – Blank ECU Programming
- 8.9 Centurion Super Pro – Blank Ecu Programming (Clone)
- 8.11 Centurion Super Pro – Module Replacement (4-Pin Models)
- 8.12 Centurion Super Pro – Module Replacement (6-Pin Models)
- 8.13 Centurion Super Pro – ECU: (Enable/Disable)
- 8.17 Centurion Super Pro – Fuel Tank Drain
- 8.18 Centurion Super Pro – Compression Test
- TSM-TSSM-HFSM-BCM
- 8.3 Centurion Super Pro – Hands Free Keyfob Programming
- 8.4 Centurion Super Pro – Keyfob Disabling (Hands Free Fob Only)
- 8.5 Centurion Super Pro – Program Personal Identification Number (Pin) / Personal Key Code
- 8.19 Centurion Super Pro – BCM: (Enable/Disable)
- 8.20 Centurion Super Pro – BCM-Lights: (Enable/Disable)
- 8.22 Centurion Super Pro – Unlocking A Security Module
- 8.23 Centurion Super Pro – Security: Push Button Fob Manual Programming
- INFOTAINMENT
- INSTRUMENTATION
- ABS
- TPMS
- ECU/ECM
- 9. Location of Diagnostic Connectors
- Centurion Glossary
Speedometer Calibration
When performing a speedometer calibration, this is usually done if you’ve installed a new Engine Control Module (ECM) or Speedometer/Cluster. If you’ve installed a new module then you will need to set the manual pulse modification, this guide will help you do that as well as go through all the steps to properly calibrate your speedometer.
NOTE: This feature is only compatible with model years 2005 & newer.
- Ensure that the IGN is ON, the RUN button is set to RUN , and the VCM is connected.
- Ensure that the battery is at 12v or more and will remain so, for the duration of the module replacement (i.e. Battery Charger).
- In Centurion, click the Active Settings button (
 ).
). - From there, navigate to Speedo Calibration.

-
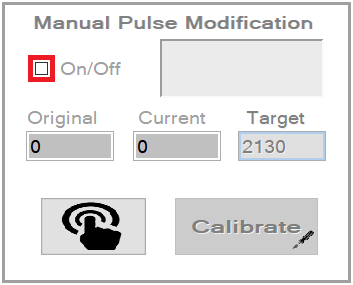
Under the Manual Pulse Modification, you will need to click the On/Off box. This will allow you to manually adjust the pulse on the speedometer.
-
Next you will click the Connect button (
 ) to communicate to the motorcycle to see what the pulse is set to currently.
-
7. After connecting to the motorcycle, you will receive a number inside the Original and Current box.
If they show a really low number like pictured below or anything over 5000, then we need to recalibrate it manually first.
-
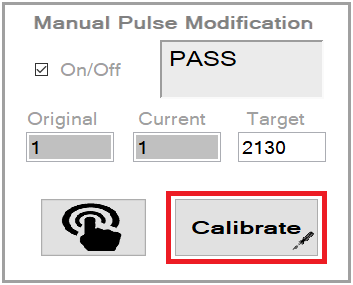
You will notice under the Target box it says 2130, we use this number because it is the average number of times a wheel spins in a mile.
So, make sure that under target the number is 2130. After confirming that press the Calibrate button ( ).
).
-
After pressing the Calibrate button (
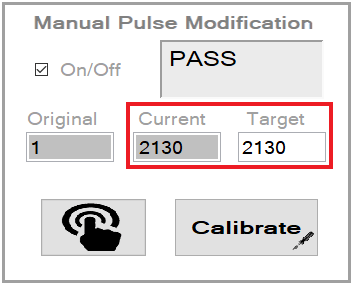
 ) you will notice the number inside the Current box will change to your Target number.
Now that we have manually adjusted the pulse, its time to fully calibrate the speedometer.
-
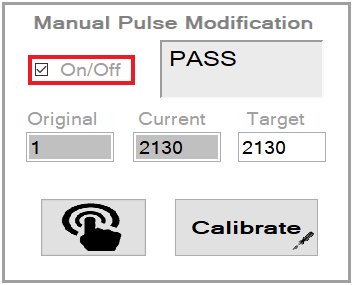
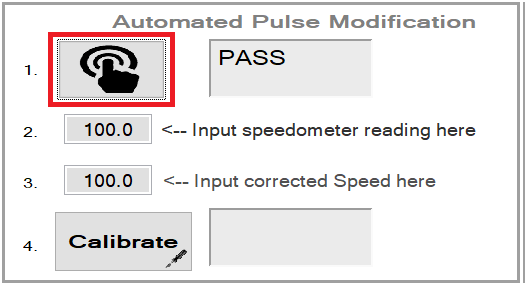
Click the On/Off box again and it will now allow you to work inside the Automated Pulse Modification box.
-
Now click the Connect button (
 ) and this will allow you to auto calibrate the speedometer.
-
What you will need to do next is either use a Dyno machine, GPS device, or any other tool that will give you the speed of the motorcycle.
In step 2, you will input the speed that the speedometer is currently showing and
in step 3 you will enter what the Dyno machine or GPS device is showing as your actual speed as.

NOTE: To understand more, in the picture above, 15 mph was input because that’s how fast my speedometer was showing, and in the next box 35 mph was input because that’s how fast the bike was actually moving.
-
Finally, we will click Calibrate button (
 )at the bottom and this will
automatically calibrate the speedometer based on the information you input into the software.
NOTE: This process may need to be completed more than once if the speedometer is still not showing the proper speeds on the speedometer.
